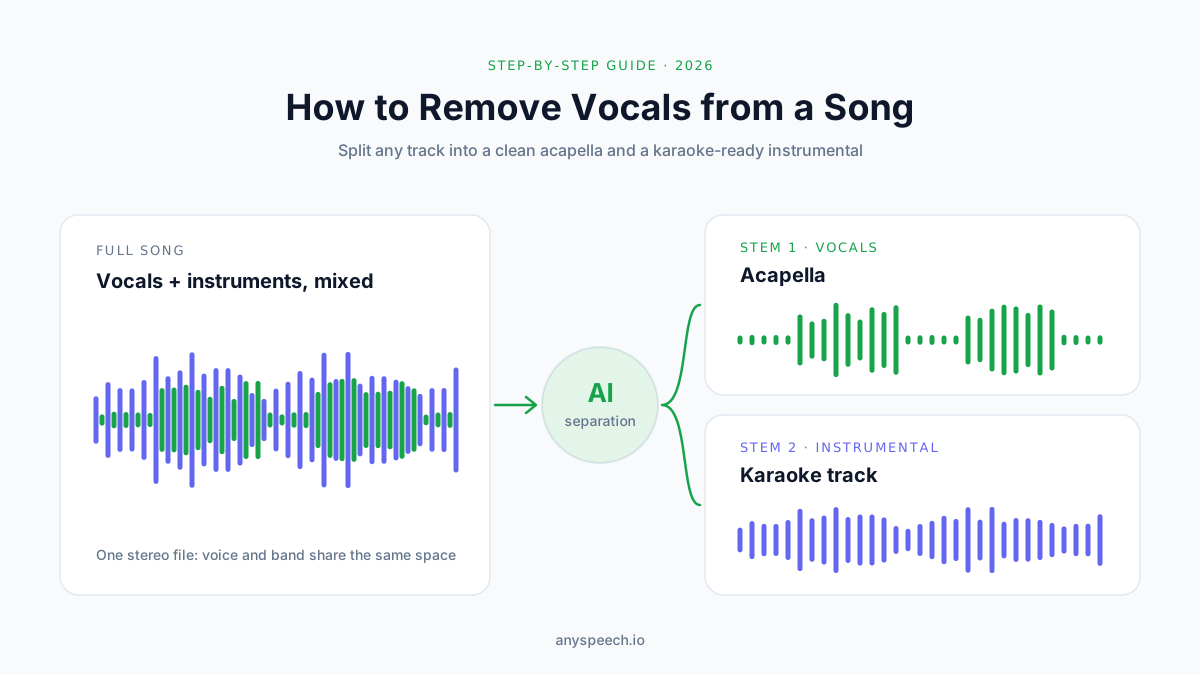
How to Remove Vocals from a Song: 5 Easy Methods (2026)
Remove vocals from any song with an online AI tool, Audacity, UVR, your DAW or your phone. Step-by-step guides, fixes for bad results, and legal basics.
A few years ago, removing vocals from a song meant flipping the phase of one channel and hoping for the best.
Usually you got a hollow, mono mess with the singer still echoing in the background and the bass line gone.
That trick is obsolete. Today's AI separation models were trained on thousands of multitrack recordings. They lift a voice out of a finished mix cleanly enough for karaoke, practice tracks, remixes and even rough demos.
The catch is that there are now a dozen ways to do it, and they are not equally good.
In this guide you'll learn five methods that actually work, from a one-minute browser tool to free desktop software. You'll also see what the published benchmarks say about quality, how to fix the most common problems, and where the legal lines sit.
What you'll learn:
- The fastest way to remove vocals, with nothing to install
- How to do it for free in Audacity, including the AI plugin most guides miss
- When a desktop app like Ultimate Vocal Remover is worth the setup
- How to use the stem splitter already built into Logic Pro, Ableton Live and FL Studio
- How to fix ghost vocals, echo tails and "watery" instrumentals
- What you can and can't legally do with the result
Quick answer: To remove vocals from a song, upload the audio file to an AI vocal remover, let the model split it into two stems, then download the instrumental. A three-minute song takes about a minute. For a free offline option, use Audacity with Intel's OpenVINO Music Separation plugin or the Ultimate Vocal Remover desktop app.
Which Method Should You Use?
Every method below produces an instrumental. They differ in speed, cost, setup and how much control you get.
Here's the short version before we go step by step.
The 5 Methods at a Glance
| Method | Cost | Setup | Speed (3-min song) | Quality | Best for |
|---|---|---|---|---|---|
| 1. Online AI vocal remover | Free daily song, then paid | None | ~1 minute | High | Most people, phones, one-off jobs |
| 2. Audacity + AI plugin | Free | Moderate | 1–3 minutes | High | Existing Audacity users, offline work |
| 3. Ultimate Vocal Remover | Free | Moderate to high | Seconds (GPU) to minutes (CPU) | Very high, tunable | Power users, batch jobs |
| 4. DAW stem splitter | Included with the DAW | Low if you own it | ~1 minute | High | Producers already in Logic, Ableton or FL |
| 5. Phone apps | Freemium | App install | ~1 minute | High | Musicians practicing on mobile |
A Quick Way to Decide
If you're not sure where to start, follow the flow below. Most people stop at question one.
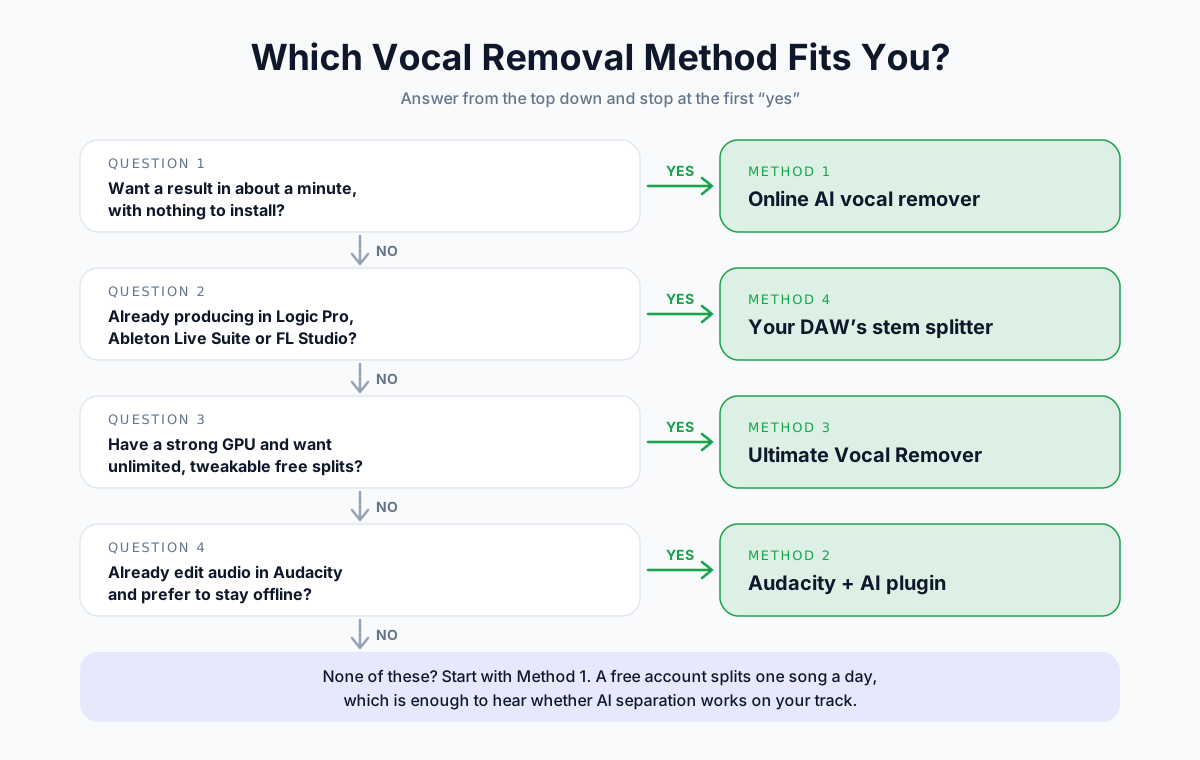
💡 Pro tip: Before you split anything, search for an official instrumental. Many albums ship with one, and karaoke versions of popular songs are widely licensed. An official instrumental will always beat an extracted one.
Before You Start: How Vocal Removal Actually Works
You don't need the theory to get a result. But knowing it will save you from the most common mistakes, especially when a result sounds wrong and you want to know why.
What Does "Removing Vocals" Mean?
Removing vocals means splitting a finished song into separate layers, called stems, and keeping everything except the voice.
Most tools give you two stems:
- Vocals (acapella): the lead voice and harmonies with no instruments
- Instrumental (karaoke track): drums, bass, guitars, keys and everything else
Some tools go further and split four or six stems: vocals, drums, bass, piano, guitar and "other." For removing vocals, two stems is usually cleaner, because the model only has to make one decision.
Method A: Phase Cancellation (The Old Trick)
Phase cancellation relies on a mixing habit. Lead vocals are almost always panned dead center, so they are identical in the left and right channels.
How It Works
- Split the stereo song into its left and right channels.
- Flip (invert) the waveform of one channel.
- Add the two channels back together.
Anything identical on both sides cancels to silence. The vocal disappears, along with anything else sitting in the center.
Why It Usually Disappoints
That last part is the problem. Bass, kick drum and snare are also mixed to the center, so they vanish too.
Meanwhile, the parts of the vocal that aren't identical on both sides survive:
- Stereo reverb and delay on the voice
- Backing vocals and doubles panned left and right
- Any vocal that was mixed slightly off-center
And if the file is mono, both channels are already identical. Cancelling them removes the entire song.
Method B: AI Source Separation (The Modern Way)
AI separation doesn't care where the voice is panned. It works on what the voice sounds like.
How It Works
A song can be drawn as a spectrogram: a map of which frequencies are playing at each moment.
A separation model has studied thousands of songs where the vocal and instrumental tracks were available separately. It learned what a human voice looks like on that map.
Given a new song, it predicts a "mask" of the cells that belong to the voice. It applies the mask to produce the acapella, and the inverse to produce the instrumental.
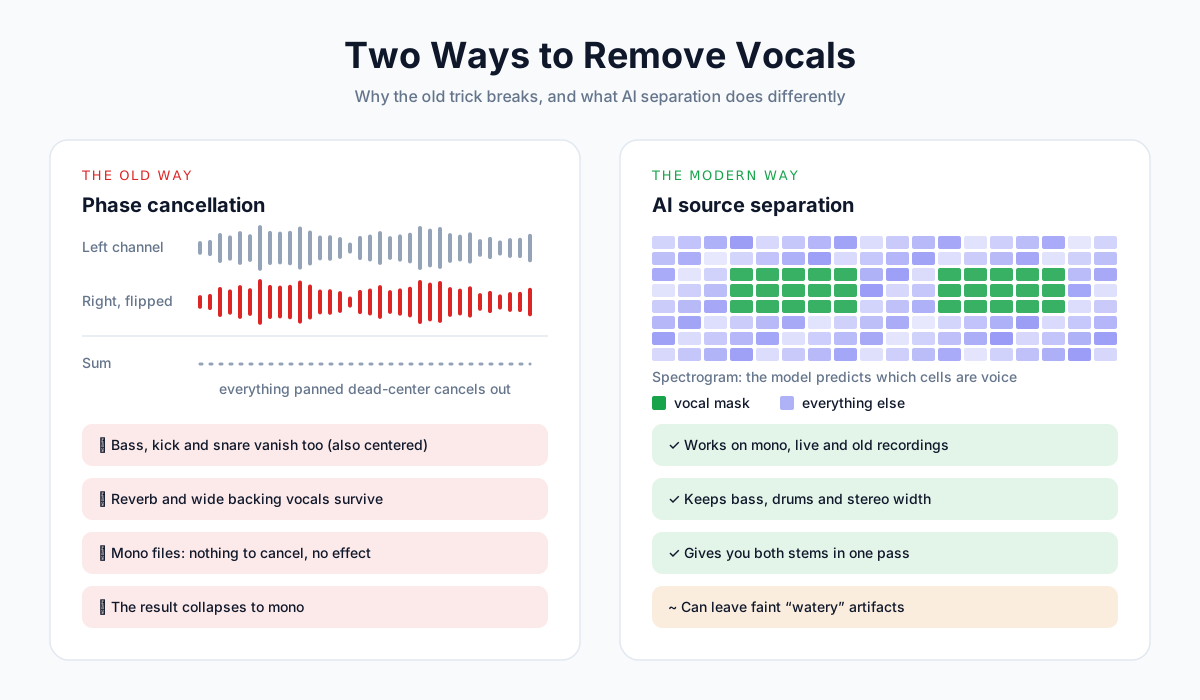
Phase Cancellation vs AI at a Glance
| Phase cancellation | AI source separation | |
|---|---|---|
| Works on mono files | No | Yes |
| Keeps bass and kick drum | No | Yes |
| Handles stereo reverb | No | Mostly |
| Handles wide backing vocals | No | Mostly |
| Output | Mono instrumental only | Stereo vocals and instrumental |
| Needs special software | No | Yes (online tool, plugin or app) |
| Typical result | Hollow, partial removal | Clean, occasional faint artifacts |
How Good Are AI Vocal Removers in 2026?
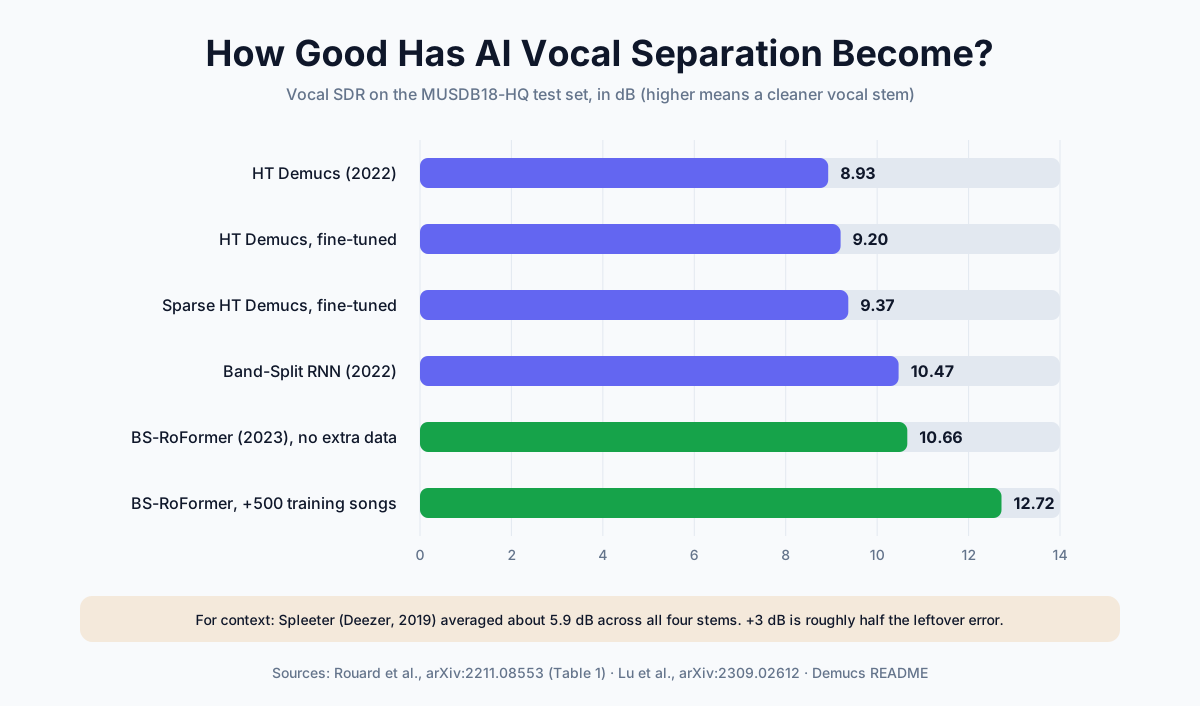
Researchers measure separation quality with SDR (signal-to-distortion ratio), in decibels, on a standard test set of 50 songs called MUSDB18-HQ. Higher is better, and every 3 dB roughly halves the leftover error.
Here's how the vocal stem has improved across well-known models:
| Model | Released by | Year | Vocals SDR | Source |
|---|---|---|---|---|
| Spleeter | Deezer | 2019 | ~5.9 dB (average of all stems) | Demucs README comparison |
| Hybrid Transformer Demucs | Meta AI | 2022 | 8.93 dB | arXiv:2211.08553 |
| HT Demucs, fine-tuned | Meta AI | 2022 | 9.20 dB | arXiv:2211.08553 |
| Band-Split RNN | Luo & Yu | 2022 | 10.47 dB | reported in arXiv:2211.08553 |
| BS-RoFormer (no extra data) | ByteDance | 2023 | 10.66 dB | arXiv:2309.02612 |
| BS-RoFormer (+500 songs) | ByteDance | 2023 | 12.72 dB | arXiv:2309.02612 |
The takeaway: within a single year of research (2022 to 2023), the best published vocal scores climbed from roughly 9–10.5 dB to 12.7 dB. Those models, or close relatives, are what free and low-cost tools run today.
📝 Note: Benchmark scores are averages. A sparse acoustic song will separate better than a dense, heavily compressed rock master, whatever model you use.
Method 1: Remove Vocals Online with an AI Vocal Remover
Best for: anyone who wants a clean instrumental in about a minute, on a computer or a phone.
This is the method we recommend trying first. There's nothing to install, you don't need a GPU, and you can hear whether the result is good enough before investing time in anything else.
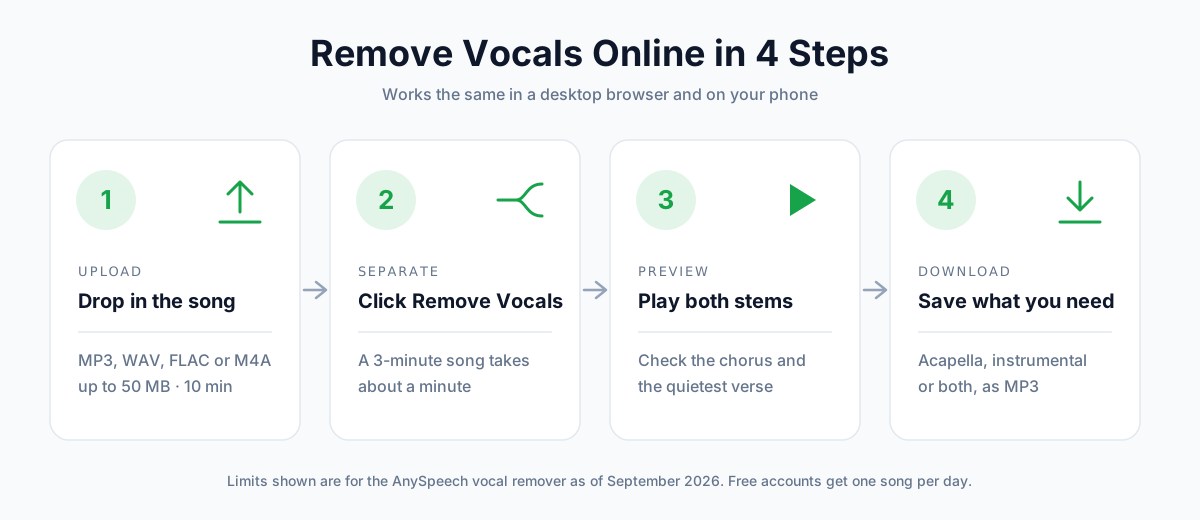
Step 1: Prepare Your Audio File
Quality in means quality out. Before uploading:
- Use the best source you have. WAV or FLAC beats MP3. A 320 kbps MP3 beats a 128 kbps one.
- Avoid screen recordings and re-recorded audio. Room echo and speaker coloration confuse the model.
- Trim silence or long intros if your file is near the length limit.
Supported Formats and Limits
| Setting | AnySpeech vocal remover |
|---|---|
| Accepted formats | MP3, WAV, FLAC, M4A (plus OGG and AAC) |
| Max file size | 50 MB |
| Max length | 10 minutes per song |
| Output | Vocals and instrumental, both as MP3 |
| Free tier | 1 song per day with a free account |
| Paid usage | 500 credits per minute of audio |
Video files aren't accepted directly. Export the audio track as MP3 first.
Step 2: Upload and Start the Separation
- Open the AI vocal remover.
- Drag your file into the upload area, or tap Upload a File on mobile.
- Click Remove Vocals.
A typical three-minute song finishes in about a minute. Longer tracks scale roughly in proportion.
Step 3: Preview Both Stems
Don't download straight away. Play both tracks on the page and listen to the two places where problems show up first:
Where to Listen
- The loudest chorus. Dense sections are where faint vocal traces hide in the instrumental.
- The quietest verse. Sparse sections expose any "watery" artifacts in the instrumental.
If both sound clean, you're done. If not, jump to the troubleshooting section.
Step 4: Download What You Need
Download the instrumental for karaoke or practice, the acapella for remixes or lyric work, or both. Free accounts get full-length downloads of both stems, not a 30-second preview.
Other Popular Online Vocal Removers
Most online tools use similar model families. The practical differences are free limits, file length caps and how many stems you get.
| Tool | Free tier (as of September 2026) | Stems | Notes |
|---|---|---|---|
| AnySpeech | 1 song/day, up to 10 min | 2 | Same account also covers voice isolation, transcription and TTS |
| LALAL.AI | Limited free minutes | Multiple stem types | Strong quality; paid packs by the minute |
| Moises | 5 uploads/month, 5 min each | 2–6 (paid) | Also has iOS and Android apps |
| BandLab Splitter | Free, files up to 15 min | 4 | Requires a BandLab account |
| VocalRemover.org | Free with ads | 2 | Quick one-off splits |
Free tiers change often, so check each tool's pricing page before relying on a limit. For a broader head-to-head, see our roundup of the best audio isolation tools.
Method 2: Remove Vocals in Audacity (Free)
Best for: people who already edit audio in Audacity and want a free, offline workflow.
Audacity is the most searched way to do this, and also the most misunderstood. There are three different approaches, and most older tutorials only cover the weakest one.
Option A: The AI Music Separation Plugin (Recommended)
Intel publishes a free set of OpenVINO AI plugins for Audacity. One of them, Music Separation, runs a Demucs v4 model locally on your computer.
It gives you AI-quality stems without uploading anything.
How to Install It
- Go to Audacity's official download page and find the OpenVINO AI plugins section.
- Download the build that matches your Audacity version and operating system.
- Run the installer, then restart Audacity.
- Open Effect › Plugin Manager and make sure the OpenVINO effects are enabled.
📝 Note: The plugin is built for specific Audacity versions. If it doesn't appear after installing, check the compatibility notes on the download page. A brand-new Audacity release sometimes gets its plugin build a little later.
How to Separate the Vocals
- Open your song in Audacity (File › Open).
- Select the whole track with Ctrl+A (or Cmd+A on Mac).
- Go to Effect › OpenVINO AI Effects › OpenVINO Music Separation.
- Set Separation Mode to (2 Stem) Instrumental, Vocals.
- Choose a device. Pick GPU or NPU if available, otherwise CPU.
- Click Apply and wait. It usually takes one to three minutes.
- Audacity adds new tracks for each stem. Mute or delete the vocal track.
- Export the instrumental with File › Export Audio.
2-Stem vs 4-Stem Mode
| Mode | Output tracks | Use it when |
|---|---|---|
| 2 stems | Instrumental, Vocals | You only need the vocals removed. It's cleaner and faster. |
| 4 stems | Drums, Bass, Vocals, Other | You want to rebalance instruments or build a practice mix. |
Option B: Vocal Reduction and Isolation Effect
This is the classic effect most Audacity tutorials describe. It's based on center-channel cancellation, not AI, so expect the limits covered earlier.
Important: since Audacity 3.5, this effect is no longer bundled with the default install. You'll need to download it from Audacity's plugin page, then install it through Tools › Nyquist Plugin Installer and enable it in the Plugin Manager.
How to Use It
- Select the whole song.
- Go to Effect › Special › Vocal Reduction and Isolation.
- Set Action to Remove Vocals.
- Adjust the settings below, click Preview, then Apply.
Settings Explained
| Setting | Default | What it does | When to change it |
|---|---|---|---|
| Strength | 1.0 | How aggressively centered audio is removed | Raise slightly if vocals remain; lower if the mix sounds hollow |
| Low Cut for Vocals | 120 Hz | Frequencies below this are left alone | Keeps bass and kick drum intact, so don't raise it much |
| High Cut for Vocals | 9,000 Hz | Frequencies above this are left alone | Lower it to keep cymbals and hi-hats bright |
Option C: The Manual Invert Method
This does the same job by hand. It's mostly useful for understanding the concept, or on a machine where you can't install plugins.
- Click the track name menu and choose Split Stereo to Mono.
- Select the bottom track only.
- Go to Effect › Special › Invert.
- Select both tracks and choose Tracks › Mix › Mix and Render.
The result is a single mono track with centered content cancelled out.
Audacity Options Compared
| AI plugin | Vocal Reduction effect | Manual invert | |
|---|---|---|---|
| Technology | AI (Demucs v4) | Center cancellation + EQ bands | Phase cancellation |
| Keeps bass and drums | Yes | Partly | No |
| Works on mono files | Yes | No | No |
| Stereo output | Yes | Yes | No |
| Extra download | Yes | Yes (since 3.5) | No |
Method 3: Use Ultimate Vocal Remover (Free Desktop App)
Best for: power users who want the highest free quality, full control over models and unlimited batch processing.
Ultimate Vocal Remover (UVR) is a free, open-source desktop app for Windows, macOS and Linux. It's a graphical front end for many separation models, including Demucs, MDX-Net and the newer Roformer family.
What You Need
| Requirement | Recommendation |
|---|---|
| Operating system | Windows 10/11, macOS or Linux |
| GPU | An NVIDIA card makes processing dramatically faster. Apple silicon Macs are supported. |
| CPU-only | Works, but a single song can take several minutes |
| Disk space | A few GB, since each downloaded model adds to it |
| Skill level | Comfortable choosing models and settings |
How to Remove Vocals with UVR
- Download UVR from its official GitHub repository and install it.
- Click Select Input and choose your song.
- Choose an output folder.
- Pick a Process Method (see the table below).
- Choose a model from the dropdown. If it isn't installed, use the download center to fetch it.
- Tick GPU Conversion if you have a supported graphics card.
- Choose output options such as Instrumental Only or Vocals Only, then click Start Processing.
Which Model Family to Pick
| Process method | Strengths | Trade-offs |
|---|---|---|
| Roformer models (e.g. BS-Roformer) | Currently among the cleanest vocal/instrumental splits | Heavier; slow without a GPU |
| MDX-Net | Clean vocals, good all-rounder | Can leave slight artifacts on dense mixes |
| Demucs v4 | Natural-sounding, multi-stem capable | Occasionally less aggressive on backing vocals |
| VR Architecture | Fast; includes de-echo and de-reverb models | Older approach for main separation |
A Two-Pass Workflow for Tough Songs
UVR's biggest advantage is chaining models:
- Separate the song with a strong vocal model (Roformer or MDX-Net).
- Run a de-reverb or de-echo model over the instrumental to remove leftover vocal reverb.
This is different from running the same separation twice, which usually makes things worse. More on that in troubleshooting.
Method 4: Use Your DAW's Built-In Stem Splitter
Best for: producers who already own Logic Pro, Ableton Live Suite or FL Studio.
Stem separation has become a standard DAW feature. If you already pay for one of these, you may not need another tool at all.
DAW Stem Splitters Compared
| DAW | Feature name | Stems | Requirements |
|---|---|---|---|
| Logic Pro | Stem Splitter | Vocals, drums, bass, other (newer versions add guitar and piano) | Logic Pro 11 or later on an Apple silicon Mac, or Logic Pro for iPad |
| Ableton Live | Separate Stems | Vocals, drums, bass, others | Live 12.3 or later, Suite edition only |
| FL Studio | Extract stems from sample | Vocals, drums, bass, instruments | FL Studio 21.2 or later, Producer Edition and above |
How to Do It in Logic Pro
- Drag the song into an audio track.
- Select the region.
- Control-click the region and choose Processing › Stem Splitter.
- Pick a preset or tick the stems you want, then run the split.
- Mute the vocal track and bounce the rest.
How to Do It in Ableton Live 12.3+
- Drop the song into an audio track.
- Right-click the clip and choose Separate Stems to New Audio Tracks.
- Tick the stems you want and pick High Quality (use High Speed only for quick previews).
- The stems land in a color-coded group. Deactivate the vocal track and export the rest.
How to Do It in FL Studio
- Drag the song into the Playlist or Channel Rack.
- Right-click the audio clip in the Playlist and choose Extract stems from sample. The first time, FL Studio downloads the model for free.
- Select drums, bass, instruments and vocals as needed. Each one lands on its own track.
- Mute the vocals and render the rest.
💡 Pro tip: Menu names shift between updates. If you can't find the option, search your DAW's help for "stem separation." The workflow is almost identical everywhere.
Method 5: Remove Vocals on iPhone or Android
Best for: musicians practicing on the go, or anyone without a computer nearby.
Option A: Use a Browser Tool (No App Needed)
Web-based vocal removers work in mobile Safari and Chrome.
- Save the song to your Files app (iPhone) or Downloads folder (Android).
- Open the vocal remover in your browser.
- Tap Upload a File and choose the song.
- Tap Remove Vocals, then play or download the stems.
Option B: Use a Dedicated App
| App | Platforms | Free tier | Stand-out feature |
|---|---|---|---|
| Moises | iOS, Android, web | 5 uploads/month, 5 min each | Pitch, tempo and chord detection for practice |
| BandLab | iOS, Android, web | Free | Splitter feeds straight into BandLab's mobile studio |
| Logic Pro for iPad | iPadOS | Subscription | Full Stem Splitter on the go |
Option C: Turn Down Vocals While Streaming
If you only want to sing along, you may not need to split anything.
Apple Music Sing lets Apple Music subscribers turn the vocal level down on supported songs, live, with real-time lyrics. You can't download the instrumental, but for karaoke at home it's instant and fully licensed.
Bonus: Get an Acapella from an Official Instrumental
Sometimes you want the opposite: the vocals without the music.
If you have both the full song and its official instrumental, there's a neat trick.
How It Works
The full mix is "instrumental + vocals." Subtract the instrumental and only the vocals remain.
- Load both files into Audacity, one above the other.
- Invert the instrumental (Effect › Special › Invert).
- Line the two tracks up precisely at the start.
- Play or export the mix. Only the vocals remain.
When It Fails
| Problem | Why |
|---|---|
| Music still audible | The two files are from different masters or have different loudness |
| Weird flanging sound | The tracks are misaligned by a few samples |
| Doesn't work at all | One of the files is a lossy MP3, which changes the waveform |
When the trick fails, an AI vocal remover will give you a cleaner acapella from the full song alone.
How to Fix a Bad Vocal Removal Result
Even the best models stumble on some songs. The good news: most problems have a clear cause and a quick fix.
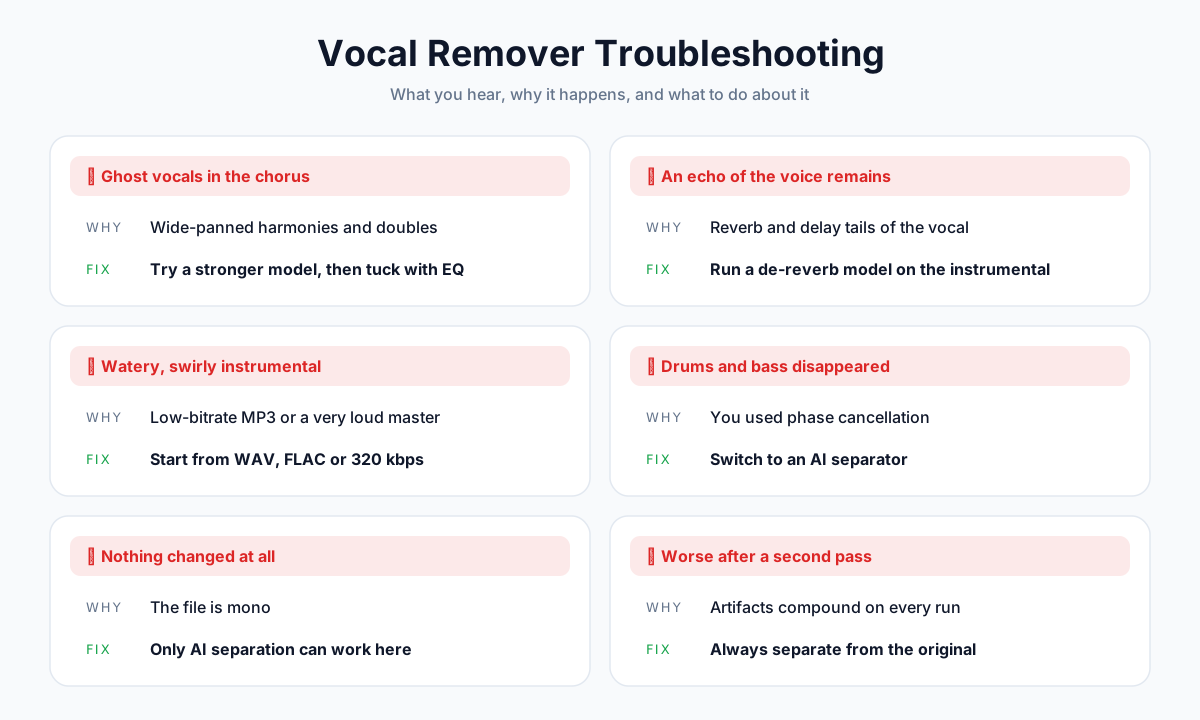
Problem 1: Ghost Vocals in the Chorus
What you hear: faint harmonies or doubled vocals in the loudest sections.
Why: backing vocals are often panned wide and heavily processed, so they look more like instruments to the model.
How to fix it:
- Try a different model. Roformer-based models are especially good at catching backing layers.
- Use a gentle EQ cut around 1–4 kHz during the chorus only.
- Accept a faint trace for karaoke. A live singer will cover it completely.
Problem 2: An Echo of the Voice Remains
What you hear: a washy tail after each vocal phrase.
Why: reverb and delay spread the vocal across time and stereo space, so part of it gets classified as "room" rather than "voice."
How to fix it:
- Run a de-reverb or de-echo model over the instrumental (UVR includes several).
- For short gaps, a noise gate or careful volume automation works too.
Problem 3: The Instrumental Sounds "Watery"
What you hear: a swirly, underwater quality on cymbals, pads or guitars.
Why: the model is uncertain in regions where voice and instruments share frequencies. Low-bitrate MP3s make it worse, because compression has already smeared those details.
How to fix it:
- Re-run from a WAV, FLAC or 320 kbps file.
- Use 2-stem mode rather than 4 or 6 stems.
- Try a different model family.
Why Source Quality Matters So Much
| Source file | Expected result |
|---|---|
| WAV / FLAC (lossless) | Cleanest separation |
| MP3 320 kbps / AAC 256 kbps | Very close to lossless |
| MP3 128 kbps | Noticeable artifacts on cymbals and reverb |
| Screen recording, re-recorded from speakers | Poor; room sound confuses the model |
Problem 4: Drums and Bass Disappeared
Why: you used phase cancellation, which removes everything panned to the center.
Fix: switch to any AI method above.
Problem 5: Nothing Changed at All
Why: the file is mono (common with old recordings and some YouTube rips). There is no stereo difference for cancellation to use.
Fix: only AI separation can work on mono files.
Problem 6: It Got Worse After a Second Pass
Why: every separation adds tiny artifacts. Feeding an instrumental back into the same model compounds them.
Fix: always separate from the original song. If you need extra cleanup, use a different kind of model, such as de-reverb, rather than repeating the same one.
What Can You Do with the Separated Stems?
Once you have clean stems, a lot of projects open up.
Uses for the Instrumental
- Karaoke: sing over the original arrangement instead of a cheap MIDI version.
- Instrument practice: play along with the full band minus the part you're learning.
- Cover recordings: rehearse your own vocal take against the real backing track.
- Background music for private projects: slideshows, family videos or class presentations you won't publish.
Uses for the Acapella
- Remixes and mashups: the raw material for DJs and producers (see the legal notes below before releasing anything).
- Vocal study: hear phrasing, breaths and harmonies that are buried in the full mix.
- Lyric transcription: an isolated vocal is far easier to transcribe. Upload the acapella to a speech to text tool to get a timestamped draft of the lyrics.
Not a Song? Use a Voice Isolator Instead
If your audio is a podcast, interview or video with background noise rather than music, a vocal remover is the wrong tool. A voice isolator is tuned for speech and removes hum, traffic and room tone instead of instruments.
And if you just need clearer calls, your phone may already have it built in. Here's how to turn on voice isolation on iPhone, Mac and Android.
Is It Legal to Remove Vocals from a Song?
Removing vocals from a song you own for personal use is generally fine. Publishing or selling the result usually is not, unless you have permission.
The act of splitting a file is rarely the issue. What matters is what you do with the stems afterward.
Why Stems Are Tricky
A released song carries two separate copyrights:
- The composition: melody and lyrics, owned by the songwriters and publishers.
- The sound recording: the specific recorded performance, usually owned by the record label.
An extracted instrumental is still part of the original sound recording. So even if you have a license to cover a song, that license usually doesn't include using the label's recording.
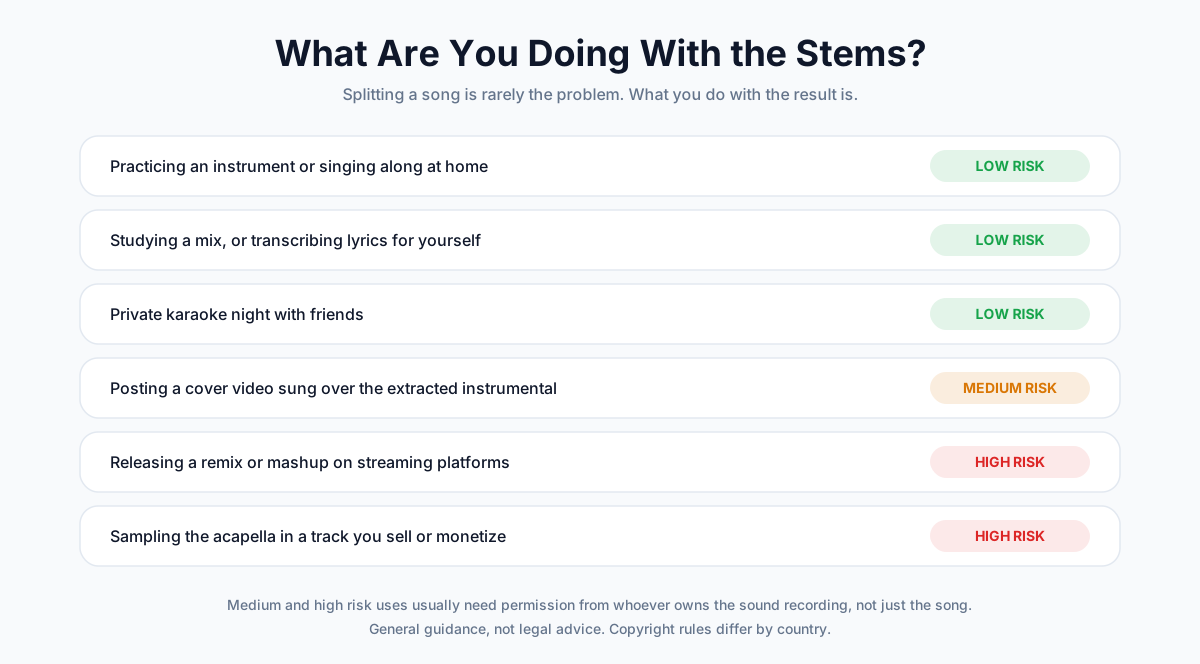
Use Cases by Risk Level
| What you do | Risk | Why |
|---|---|---|
| Practice or sing along at home | Low | Private, non-commercial use |
| Study a mix or transcribe lyrics for yourself | Low | Private, non-commercial use |
| Private karaoke with friends | Low | No public distribution |
| Post a cover video over the extracted instrumental | Medium | Platforms may claim, mute or remove it |
| Release a remix or mashup on streaming services | High | Needs the recording owner's permission |
| Sample the acapella in a track you sell or monetize | High | Needs clearance for the recording and the composition |
📝 Note: This is general guidance, not legal advice. Copyright rules differ between countries. If you plan to release or monetize something built on another artist's recording, talk to a music lawyer or clear the sample first.
The Safe Alternatives for Public Projects
- License an official instrumental or karaoke version.
- Use royalty-free backing tracks.
- Record your own arrangement of the song, and license the composition as a cover.
Frequently Asked Questions
Can I remove vocals from a song for free?
Yes. Free options include Audacity with Intel's OpenVINO Music Separation plugin, the Ultimate Vocal Remover desktop app, and online tools with free tiers. AnySpeech's vocal remover gives free accounts one song per day, up to 10 minutes and 50 MB, with both stems downloadable in full.
What is the best way to remove vocals from a song?
For most people, an online AI vocal remover is the best balance of quality and effort: upload, wait about a minute, download. Producers who own Logic Pro, Ableton Live Suite or FL Studio can use the built-in stem splitter. Power users wanting maximum control should try Ultimate Vocal Remover with a Roformer model.
How do I remove vocals from a song in Audacity?
Install Intel's free OpenVINO AI plugins, select the song, and choose Effect › OpenVINO AI Effects › OpenVINO Music Separation in 2-stem mode. The older Vocal Reduction and Isolation effect still works but uses center-channel cancellation, and since Audacity 3.5 it's a separate download rather than a built-in effect.
Why can I still hear vocals after using a vocal remover?
Usually it's backing vocals, doubled parts or reverb tails. These are panned wide or smeared in time, which makes them harder to classify. Try a different model, start from a lossless file, and use a de-reverb model on the instrumental. With phase cancellation methods, leftover vocals are expected, and switching to AI fixes most cases.
Can you remove vocals from a mono song?
Only with AI separation. Phase cancellation needs a difference between the left and right channels, and a mono file has none, so cancellation either does nothing or wipes out the whole song. AI models work from the sound of the voice, not its stereo position, so mono recordings separate fine.
Does removing vocals reduce audio quality?
Slightly. Even the best models leave faint artifacts, most audible on cymbals, reverb and sustained pads. Starting from a WAV, FLAC or 320 kbps MP3 minimizes it. Dense, heavily compressed masters show more artifacts than sparse or acoustic songs.
How do I get just the vocals (acapella) from a song?
Use the same tools and download the vocal stem instead of the instrumental. Every method in this guide produces both. If you already have the official instrumental, you can also invert it against the full song to cancel the music, but only if both files come from the same master.
Can I remove vocals from a song on my iPhone?
Yes. Open a browser-based vocal remover in Safari and upload the song from the Files app, or install an app such as Moises or BandLab. If you just want to sing along, Apple Music Sing can turn the vocals down on supported songs without creating a file.
Can I remove vocals from a YouTube video?
Only if you have the rights to the audio. Download or export the audio track legally (for example, your own uploads from YouTube Studio), save it as MP3 or WAV, then run it through a vocal remover. Most online vocal removers accept audio files rather than video links or video files.
How long does it take to remove vocals from a song?
With an online AI tool, a three-minute song takes around one minute. Audacity's AI plugin typically needs one to three minutes on a modern computer. Ultimate Vocal Remover finishes in seconds on a strong NVIDIA GPU but can take several minutes on CPU alone.
The Bottom Line
Removing vocals from a song used to be a party trick that half-worked. AI separation turned it into a reliable one-minute job.
Here's the simplest path:
- Start online. Upload one song to an AI vocal remover and listen to the chorus.
- Go local if you need to. Use Audacity's AI plugin or Ultimate Vocal Remover for offline or bulk work.
- Use your DAW if you already produce in Logic, Ableton or FL Studio.
- Feed it good audio. A lossless source fixes more problems than switching tools.
- Keep it personal unless you have permission for the recording.
Ready to try it? Upload a song to the free AI vocal remover and get both the acapella and the instrumental in about a minute. No credit card needed.
If you're working with voices beyond music, explore our guide on how to transcribe audio to text, or compare options in our best audio isolation tools roundup.
Author

Categories
More Posts

How to Clone Your Voice with AI in 2026 (Step-by-Step + Best Tools)
Learn how to clone your voice with AI in about 30 seconds. A step-by-step guide to voice cloning, getting the best quality, adding emotion, cloning in other languages — plus the ethics.
How to Get a Transcript of a YouTube Video (6 Ways, 2026)
Get a transcript of any YouTube video: built-in Show transcript, phone, free generators with TXT/SRT export, YouTube Studio, videos with no captions, and code.

Convert Text to Audio: The Complete Guide to Converting Text Into Speech (2026)
Learn how to convert text to audio in minutes using AI voices. Free tools, step-by-step guide, voice quality tips, and best use cases for content creators, educators, and marketers.